Our weird and wonderful blog post this week is part two of our Navigation Stations how to’s. Basically, we’re telling you all the super handy-dandy, secret squirrel ways of getting around your showcases and your workshops.
If you caught our last Navigation post, you will have learnt the best ways to get around your showcase in the app. Cool, now we’ve got that down pat - let’s sort out the ins and outs of getting around behind the scenes.
Tabs Cheat Sheet
So your showcase has a few places you can head to, but with all this talk of tabs and showcases and dropdowns and stuff, it can get a bit confusing. I’ve written up a small Glossary of what each of the main tabs mean.
Home:
This is where your showcases live (because it’s home, geddit?). You’ll see a list of all your showcases, both published and unpublished. From this list you can preview showcases, go through to the editing screen, manage access, manage sharing, and a bunch more. You will likely come back to this screen the most out of all of them.
Showcases:
Huh, but we were just on the showcases screen? Almost but not quite - there is a difference between the home tab and the showcases tab.
The showcases tab shows the viewer versions of your published showcases only. You can also switch on Kiosk Mode when you are on this screen so the Home tab becomes disabled. This is essentially a great way to use Showcase on viewer mode, when you don’t have the app available. You cannot edit or change any details regarding your showcases in this screen. Cool? Cool.
Files:
Welcome to the File Library! It’s fairly self-explanatory - anything you load into showcase gets stored in your file library. You can be a tidy kiwi and make some lovely organised folders to make sure you know where things live but otherwise, you can find anything in your library by using the search box in the top right.
Just to make it extra useful, you can search by file type also - all, docs, images, or videos.
Users:
This is your User Directory.
Here you can create groups of users, search for particular users, see what level of access they have, and also what groups they are a part of. Essentially anything you need to know about your users is in this wonderfully informative tab. Simply click on a user's name and it will whisk you away to their profile full of deets.
Email Pitch:
Here you can send an entire showcase and/or files allowed to be shared via email. Then you can track the recipients' viewing on the Sharing History page. It’s pretty awesome and is one of our favourite features. If you have sharing turned on for other files in your showcase, you can also select these here too if you’d like to send some files separately.
Settings:
The serious stuff. Under settings, we have 4 categories: Email, Hotspot, Workshop, and Subscription.
-
Email: Where you edit how you’d like your sharing emails and email pitch to look. Beautify it.
-
Hotspot: Here is where you can choose the default look of your hotspots (font, colour etc).
-
Workshop: You’re able to edit access settings, titles, partner workshops, and also delete your workshop.
-
Subscription: manage how your subscriptions is billed (thank you!).
-
Reporting: This is where all your super cool and innovative workshop analytics live. The data hub.
Barrelling on here…
Outline:
You can view the outline from the ‘More’ drop-down, at any point when working in the workshop. It can appear in either view, in your showcase or on the list of showcases.
Pop that sucker on and you’ll see each and every slide in your showcase and other slides that link to them. It’s essentially a “site map” of what you’ve built. Bonus, you can even click on the linked ones to take you right there. Outline is very useful for those times where you know you need to change something, but you can’t remember where to find it in the depths of your showcase.
Flick through from listview to grid view, whatever works best for you. Both views include edit links for every page so you can go directly to that page to make changes, instead of navigating through the whole showcase.
Links:
Slides tend to link to one another, sometime down multiple different layers. It can be hard to determine what slides link where, and you can end up a bit bamboozled.
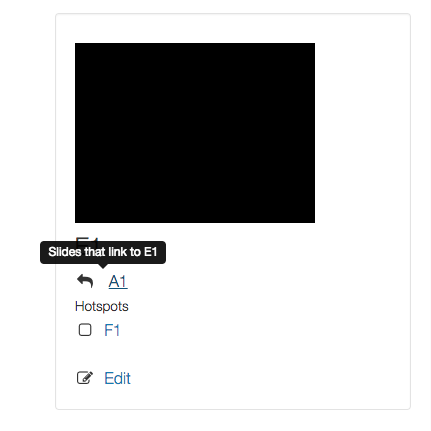
When you are in the Outline function and you click on a slide, you'll see a list of number and letter - like A1, B1, etc. There aren't lists of Bananas in Pyjamas, it's our slide identification system. Just like Excel, it runs A-Z, then AA-AZ, BA-BZ & so on. Letters are assigned based on the order the slides are created.
Numbers will increment when you have multiple images to swipe through in a gallery. This way, each slide ends up with a unique identifier that you can refer to in the outline. Note that identifiers will re-assign when you delete or edit slides!
If you see these under an outline view of a slide, this means this slide has links other slides that link here. You can click on each of these and it will take you directly to that slide.
This is a good way to check and see if you have double ups of slides/info, or if you have the same slide linked back to twenty different places.
Analytics
To skip the steps of filtering your analytics into exactly what you need, you can effectively jump the queue and sort by showcase analytics with just one click.
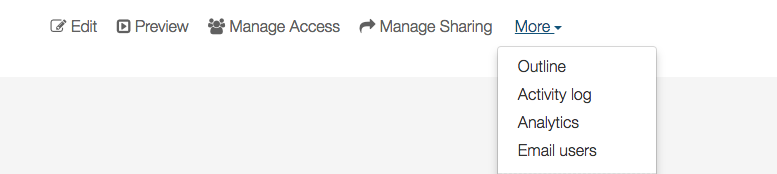
You can jump to a particular showcases analytics by clicking on the "More" drop-down, either below the showcase title if you are in Editor view, or on the list of options beside your showcase thumbnails on the home page.
Click the More drop-down, and click "Analytics".
This will whisk you away to your reporting tab and will present you with all the lovely statistics for that singular showcase.
Phew! Tired of zooming around your showcases at breakneck speed and efficiency yet? Me too. Let's go for a lie down.
(If you would like to chat more about these or you have any questions or queries - get in touch at helpdesk@showcaseworkshop.com)